Monday, December 28, 2009

The Last of the Christmas creations

This year I made us all matching stocking from the Figgy Pudding Line, that I first came across here. I let the kids pick any two fabrics that they loved for me to make their stockings out of. I was on the ball and even made one for baby for next Christmas. I used the stocking pattern that I fell in love with here.
Here are this years Christmas Jamma's...finished a day early on December 23rd.
I wasn't the only one busy this year. My oldest was busy making gifts for her little sisters. A doll for Kymberly and a purse for Tansley. I was so proud of her for working so hard and doing such a great job.

Monday, December 21, 2009

Christmas Dresses

This year I let the oldest two pick their own patterns for their dresses. We headed to the fabric store and looked through the pattern books. Simplicity patterns were on sale that day so that is what we stuck with. Kathryn chose pattern 2767. Tansley chose pattern 3545. And they both agreed that pattern 2709 was perfect for Kymberly. Here's how they turned out.

My proper Big Girl. When did she get so big?

When she put her dress on she said to me "Don't I look Like a Princess?"

She was so proud of her dress. She told everyone at church that "Mommy made it!"

The Handsome crew....minus me, but somebody had to take the picture, right?

Wednesday, December 16, 2009

Christmas Break

OK, so life is getting busier as Christmas approaches, I am so very behind in my sewing because I had almost two weeks with out my sewing machine because it died on me. What I am trying to say is that I am officially taking my Christmas break. I do plan to post pictures of the girls dresses when they are done, as well as some of my other projects that I am working on. So I'd better go work on them instead of playing here on the computer.

See you in the New Year!

P.S. If you are interested you can head on over to my personal blog to read my daily "Days of Christmas posts". If you are up to a challenge read about it here.

Tuesday, December 8, 2009

More easy Christmas kids crafts.

Again, it's all about me today. I have two more crafts to share with you. You can also find them in this free ebook.

Quick Glitter Pine cones
Materials:
  • Pine cones in various shapes and sizes
  • Spray adhesive
  • Glitter in assorted colors
  • Ziploc bags
  • Ribbons or pipe cleaners
  • Hot Glue gun
Steps:
  1. Cover working area with newspaper.
  2. Put a couple of tablespoons of glitter in a ziplock bag. The bigger the pine cone the more glitter you will need.
  3. Spray adhesive all over pine cone, being sure to get in between the cracks.
  4. Place pine cone in the ziplock bag with the glitter and seal. Make sure it is sealed tightly.
  5. Let your little one shake to their hearts content or until the pine cone is covered in glitter.
  6. Remove pine cone and set aside to dry completely.
  7. Repeat as many times as desired.
  8. When dry, attach a ribbon with the glue gun to hang on the Christmas tree or fold a pipe cleaner in half and glue the center of the pipe cleaner to the bottom of the pine cone.
  9. Use the pipe cleaner to fasten to the tree branch. (see picture)


Pretty Beaded Icicle ornaments
Materials:
  • Metallic, crystal or opaque beads in assorted shapes and sizes
  • Metallic pipe cleaners
  • Large sequins of any shape (Stars in Picture)
Steps:
  1. Thread one large sequin on to the pipe cleaner. Fold up about 1/4” of the pipe cleaner to make a knot (so the sequin does not slide off).
  2. Thread on beads in desired pattern until you reach your desired length. Be sure to leave about 3” of pipe cleaner at the top to make a loop.
  3. Bend pipe cleaner over to just reach the last bead. Twist the end to hold in place. Now you should have a loop to hang your icicle on the tree.

Tuesday, December 1, 2009

Easy Kids Christmas Crafts

Looking for easy Christmas crafts to do with your kids? I just might have the answer for you.

Today I am tooting my own horn.I recently received an email from an editor of the Favecrafts.com website to see if I would be interested in contributing some of my creative ideas for the Christmas season. I was simply thrilled that I had been noticed and more than excited to participate. I was already planning on posting a few simple Christmas Craft ideas here, so I decided to send them to FaveCrafts to share with the whole wide internet world.

So for the next few weeks I will share my tutorials here, as well as provide a link to the published version at Favecrafts.com.


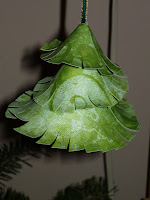
Three Tiered Christmas Tree and Four sided Christmas Ball


What you will need:

-Scrapbook paper
-glue stick
-pony beads
-ribbon
-glitter glue
-glitter pens or markers
-paperclips

Three tiered Christmas tree instructions

  1. Cut three circles(small, medium, large)from your scrap book paper using the circle template.
  2. Cut out of each circle the quarter section as marked
  3. Add additional decoration as desired on each circle using glitter glue or glitter pens. Let dry.
  4. Using the glue stick, glue along on straight edge.
  5. Pull the other straight edge to over lap the glue making a cone. Place a paperclip along the glued edge to hold in place until the glue dries.
  6. Cut a piece of ribbon about 10” long. Fold in half. Tie a pony bead on to the loose end(the pony bead is to keep the cones from sliding off the ribbon or out of place). Thread the ribbon through the hole in the top of the largest cone(if the whole is to small make a small cut so the ribbon will thread through. Tie another pony bead about 1” above the large cone. Thread the ribbon through the whole of the medium cone. Tie another pony bead on about 1” above the medium cone and thread on the smallest cone.
  7. Optional. Cut slits in the lower edge of each cone and curl the slitted paper upwards using a pencil.

Four sided Christmas Ball Ornament

  1. Cut four circles of the same size from the scrap book paper.
  2. Add additional decoration as desired on each circle using glitter glue or glitter pens. Let dry.
  3. Fold each circle in half.
  4. Cut about a 6” piece of ribbon
  5. Using a glue stick, glue along one half of one circle. Fold cut ribbon in half and glue on the folded edge of the circle
  6. Place one half of another circle on the glued side of the other matching curved edges. Use a paperclip to hold in place until the glue has dried. Repeat for each circle, glueing the forth circle to the first.

All of these crafts have been tried and tested by real kids...namely mine. Next week I'll have two more easy Christmas Craft Ideas for you to do with your kids. In the mean time you should go check out Favecrafts.com. It has tonnes of...you guessed it...craft ideas for all occasions and all levels in any medium you can imagine. Look for me in the future on the Favecrafts blog as a guest blogger.
Related Posts Plugin for WordPress, Blogger...